d2jsp
Log InRegister
d2jsp Forums > Diablo II > Diablo 2 Discussion > Strategy & Guides > The V1.13 Gm Es Hybrid Blizzard Sorceress > Or... The Minnie.
12316Next
Add Reply New Topic New Poll
Member
Posts: 15,449
Joined: Oct 6 2007
Gold: 71.64
Jun 29 2011 12:53pm
Minnie, The Original v1.13 GM Energy Shield Hybrid Blizzard Sorceress


Introduction:

Through the years, I have made just about every character imaginable. From the solid Vindicator/Templar Paladin to the versatile Poison and Bone Necromancer, there is one character that outshines all the others, like the Northern Star on a pitch black night.

That character, of course, is the Blizzard Sorceress.

There are many routes you can take when making a Blizzard Sorceress... Pure vitality, vitality with max block, Energy Shield, and more. After testing several different builds, I knew I wanted to make an Energy Shield Blizzard Sorceress without maximum block, but there was a detrimental problem; there wasn’t a single decent guide online! So, with my substantial background knowledge in Diablo 2, along with a significant deployment of trial and error, I devised my own build. After keeping the build a secret for two long years, I am now willing to impart my knowledge. I’m not some self proclaimed genius, nor do I claim that I am the best Blizzard Sorceress on East. I have simply discovered a Blizzard Sorceress build that works wonderfully. I will do my best to provide options that fit your budget, and I will also provide the statistics of my Blizzard Sorceress, Minnie, at the end of each section so that you have something to compare to. Enjoy.

Hybrid, You Say?

Indeed, I did! Commonly, when one thinks of a hybrid character, thought tends to gravitate towards the famous Trap/Whirlwind Hybrid Assassin. Or maybe you think of the popular Vanquisher, a Paladin who uses both Smite and Blessed Hammer to his advantage. With the Energy Shield Hybrid Blizzard Sorceress, it is not the offensive aspect of the character that’s been hybridized, but the defensive. What makes this character a hybrid is her delicate balance between Energy Shield, life, and mana. This balance can be incredulously difficult to achieve, but guess what? That’s what this guide is for! So let’s move on to the actual build, shall we?

Section I: Stats

Stats are probably the trickiest part of this build. You want exactly enough strength to wear your Spirit Monarch when fully equipped… That’s obvious. You also want to balance your life and mana with Energy Shield so that you can tank a few hits. My sorceress, for example, can tank an entire Whirlwind from a BvC, as well as 4-5 Blessed Hammers from a well rounded Hammerdin. Finding this balance can prove difficult. This section will help you to disperse your stat points.

Strength: 156 with every last piece of your gear on.

Dexterity: None.

Vitality: This is where it gets tricky. If you can afford Cold Grand Charms with 40+ life, you want to place about 80 to 100 points into vitality. If your Grand Charms are lower end, say 35-40 life, 100 to 125 points may be necessary. If you can afford no more than basic skill Grand Charms, you may want to place up to 150 points into vitality.

Energy: After you’ve put all the required points into Vitality, hold shift and click the Energy tab. Mana is by no means your life force as some Energy Shield guides have suggested, especially for this explicit build. Having a particular ratio is extremely important.

Minnie has exactly 156 strength with all of her gear on. The reason 176 strength is displayed in the character screen is due to the fact that she can switch out her Chains of Honor (+20 to Strength) for her Jeweler’s Armor, discussed in the Equipment Section of this guide. She has absolutely no points into dexterity. She has 80 points into vitality, and the rest into energy. She has seven Grand Charms with 45 life, one Grand Charm with 12% Faster Hit Recovery (which we will discuss later), and thirteen Small Charms with 20 life and 17 mana. After using Battle Orders, Minnie has 1,927 life and 3,505 mana.

Section II: Skills

Skills can also be a complicated aspect of this build. As I’ve previously stressed, you want to find a perfect balance between Energy Shield, life, and mana. Points into Telekinesis are necessary, while points into Energy Shield are not. If you do not know how Energy Shield works in relation to Telekinesis, there is an excellent guide here. For this build, you want to hit the 1:0.75 ratio. Because this is not a pure Energy Shield Sorceress (You’ll be aiming for around 70% absorb from your Energy Shield, not the typical 95%), life, mana, and resistances all play an equal role. Having less than 80% absorb from your Energy Shield also allows you to use Mana Pots, which, in particular situations, makes Minnie virtually unstoppable. If you’ve never played a Blizzard Sorceress of any type before, you can gain further knowledge of her attacks in the PvP Strategy section of this guide.

Fire Skills:

Warmth – 1 point

Lightning Skills:

Telekinesis – 20 points, no ifs, ands, or buts. This will put you at a 1:0.75 ratio, allowing you to tank like the American Army. At a 1:0.75 ratio, a mana pool of 3,000 becomes an effective 4,000 or so. Also, unbeknownst to many players, this skill is the Sorceress’s version of the Assassin’s Mindblast.

Teleport – 1 point

Cold Skills:

Ice Bolt – 20 points

Ice Blast – 20 points

Frost Nova – 1 point

Glacial Spike – 20 points (Max this last!)

Blizzard – 20 points

Frozen Orb – 1 point

Cold Mastery – 20 points

Now, some of you may be confused after looking over this section of the guide. You may be thinking something like, “No points in Energy Shield? I thought this was an Energy Shield Sorceress!” or “What about shiver armor? I need some more defense.” Lucky for me, you, and anyone interested in this build, there are several duped bases in which you can make a highly efficient Call to Arms. We will discuss that in the next section.

Minnie's skills are distributed as listed. She is still working on maxing out Glacial Spike. She does not have any points into Chilling Armor or Energy Shield, yet she uses both of these skills every time she enters a game.

“Impossible!”

Not with the proper equipment, which brings us to the next section.
Member
Posts: 15,449
Joined: Oct 6 2007
Gold: 71.64
Jun 29 2011 12:53pm
Section III: Equipment

Faster Cast Rate:


FCR% FPS
0 13
9 12
20 11
37 10
63 9
105 8
200 7


Faster Hit Recovery:


FHR% FPS
0 15
5 14
9 13
14 12
20 11
30 10
42 9
60 8
86 7
142 6
280 5


There are several routes you could take here. Regardless of what equipment you decide to use, you must always hit 105% Faster Cast Rate and 86% Faster Hit Recovery (as displayed by the charts above). Also, for this build, you should be aiming for around 70% Absorb with your Energy Shield. Depending on the gear you use, your damage will vary, as well as your life, mana, and resistances. As I stated in the introduction, I will do my best to provide a build that fits your budget. Minnie has all 100% perfect gear, but I understand that most Diablo 2 players cannot afford such quintessential paraphernalia. Anything that Minnie uses will have an asterisk next to its title. While some say Facets are unnecessary, this does not hold true for the impeccable Cold Sorceress, as piercing an enemies resistances is her primary means of taking down even the most resilient opponents. One should note that while resistances may have no bearing on a 95% Energy Shield Sorceress, they are crucial to your survival if you choose to utilize this build.

Helms:

Nightwing’s Veil Spired Helm* – The typical hat for cold based Sorceresses everywhere. It provides +2 to all skills, which will help you with your Energy Shield, as well as your Battle Orders. It also packs up to +15% to Cold Damage, which can be made even greater with a 5/5 Cold Rainbow Facet Jewel. Some players may need to Shael or jewel it. We’ll get to that in a bit.

Rare Circlet with +2 to Sorceress Skills and 20% Faster Cast Rate – While the magic circlet of the same statistics (listed below) is a much cheaper alternative, a rare circlet can provide you with massive strength boosts, not to mention a healthy dose of life and mana. While top tier circlets of this kind may prove expensive, it may be worth your time to invest in one. The points you can save are precious and could vastly improve your life and mana levels. You could socket it with two 7% Faster Hit Recovery jewels, two Facets, or anything else that suits your needs. Nightwing’s Veil is still your best option for raw damage output, but, while costly, a Rare Circlet is not a bad choice.

Magic Circlet with +2 to Sorceress Skills and 20% Faster Cast Rate* – If you can’t find or afford a decent Nightwing’s Veil, a magic circlet can present a healthy alternative. Get one with 2 open sockets, as this will provide more versatility. Socketing it with two 5/5 Cold Rainbow Facet Jewels is by no means a bad idea.

Magic Circlet with +3 to Cold Skills and 20% Faster Cast Rate – Overall, the +2 to Sorceress Skills circlet is a better option for this particular build. Alternatively, if you’re doing alright with your Energy Shield percentage but are lacking damage, a circlet with +3 to Cold Skills should help to even that out.

Armor:

Chains of Honor* – Simply put, this protective shell is splendid. An excellent option if you don’t need any Faster Cast Rate from your armor. It provides a sexy +2 to All Skills, +20 to Strength, +65% to All Resistances, and an often underappreciated +8% Damage Reduction. This is Minnie's primary armor. Because this build delicately balances her life and mana, resistances prove very important. Using a Chains of Honor could be the difference between being able to tank just 2 or 3 Fireballs or up to 8 or 9 Fireballs from a deliciously functioning Fire Sorceress. The sorceress already has teleport, so Enigma is unnecessary. Some argue that Enigma is well worth it due to the points you save in strength, but I hardly agree. The benefits of a Chains of Honor far outweigh those of any Enigma you can find.

Jeweler’s Armor of the Whale* - This is my secondary choice for armory purposes. The 150 to 180 life (after Battle Orders) that you gain from this armor may save your ass, especially if resistances (such as versus a BvC Barbarian or Smite Paladin) are not needed… not to mention the red appearance is just plain gorgeous. A Jeweler’s Armor of the Whale provides an immense amount of versatility. Minnie’s is socketed with four 5/5 Cold Rainbow Facet Jewels. If you need Faster Hit Recovery, strength, or resistance, you can jewel this armor to fit your own specific personal needs. Because, however, this armor lacks any base resistance or Damage Reduction, the Chains of Honor is still, by far, your best option.

Ormus’ Robes Dusk Shroud – This is an incredibly feasible option for Blizzard Sorceresses everywhere. Like Nightwing’s Veil, it provides a helpful +15% to Cold Damage, as well as +3 to a select Sorceress skill. It also smacks you with a superb 20% Faster Cast Rate. The Robes are the best option for anyone having trouble reaching that 105% Faster Cast Rate breakpoint. Obviously, you should aim to get one with +3 to Blizzard. Another option would be to get one with +3 to Energy Shield, but I would only recommend this if you are having difficulty finding or affording a Call to Arms staff granting the same skill. Shael this armor if you need the Faster Hit Recovery. Putting a jewel with + All Resistances isn’t a bad choice either, considering this armor grants you no base resistances whatsoever.

Skin of the Vipermagi Serpentskin Armor – The ever indulgent Skin of the Vipermagi. This classic armor is a fantastic choice for your Blizzard Sorceress, especially if you can afford to lose some damage. It’s incredibly cheap, and still provides +1 to All Skills and a good amount of elemental resistance. It’s like the lovechild of Chains of Honor and Ormus’ Robes, born with Daddy’s resistance and Mommy’s Faster Cast Rate.

Jeweler’s Armor of Stability – Same benefits as the Jeweler’s Armor of the Whale, except instead of providing life, it provides 24% Faster Hit Recovery. If you are falling short of the Faster Hit Recovery breakpoint but would like to socket your armor with four 5/5 Cold Rainbow Facet Jewels, this might be a viable option.

Weapons:

Death’s Fathom Dimensional Shard* - This is the primary choice for cold Sorceresses across the realm. With a whopping +30% to Cold Damage, +3 to Sorceress Skills, and a robust boost to both fire and lightning resistances, this is your best option. Try to get one with +30% to Cold Damage and close to +40% to both fire and lightning resistances. Socket it with a 5/5 Rainbow Facet Jewel if you can. Jewels for Faster Hit Recovery, strength, or mana are also a viable option.

Rare Orb with +2 to Sorceress Skills, 20% Faster Cast Rate, and +3 to Blizzard – This is another decent option, especially if you like to be stylish. A weapon like this allows you to carry superior Blizzard damage while maintaining 105% Faster Cast Rate. Death’s Fathom is, overall, a better choice, but if you can find a rare orb with the previously listed statistics, 2 sockets, life, and mana, grab it and run for the hills.

Doom Berserker Axe* - While this may seem like a silly choice to select as your primary means of weaponry, it is actually an incredibly practical option for any Blizzard Sorceress. It provides +2 to All Skills, as well as up to -60% Cold Resistance. Regrettably, it lacks any Faster Cast Rate whatsoever, so be sure to compensate. A Doom Berserker Axe with -60% Cold Resistance will make slapping around stacked resistance Barbarians and Paladins a breeze.

Gloves:

Frostburn Gauntlets* – These are, by far, your best option. They offer a sizeable increase to your mana. So sizeable, in fact, that the use of Frostburns may make or break your character. Minnie’s Frostburns increase her mana by almost 800 after Battle Orders. Unless you need Faster Cast Rate or Faster Hit Recovery from your gloves, there should be no other choice.

Trang-Oul’s Claws Heavy Bracers – These are your best option if you absolutely need 20% Faster Cast Rate from your gloves. They also give +30% to Cold Resistance, which doesn’t hurt. I know, Magefists also provide 20% Faster Cast Rate, but overall, the +30% to Cold Resistance from Trang-Oul’s Claws outweighs any other attributes that Magefists might carry.

Bloodfist Heavy Gloves – These aren’t a bad choice either. If you can’t seem to hit that 86% Faster Hit Recovery breakpoint, these gloves dish out a nasty 30% Faster Hit Recovery more for you. They also supply a substantial +40 to Life. Sadly, however, Frostburns are still your best option.

Boots:

Grim Spur Chain Boots* - These are simply perfect for this build. They present you with a good amount of Faster Run/Walk, an almost obligatory 20% Faster Hit Recovery, +19 to Strength, and significant resistances. Regrettably, they are not available on every Diablo 2 Realm, nor are they inexpensive, so I will provide you with other options.

Sandstorm Trek Scarabshell Boots – Sandstorm Treks are pretty much your best option after Grim Spurs. Though they don’t provide the resistances that Grim Spurs do, they still supply that necessary 20% Faster Hit Recovery, as well as a bulky enhancement to your strength and vitality.

Rare Boots with Faster Run/Walk, Faster Hit Recovery, and Resistances – Rare boots aren’t a terrible option, but hitting 86% Faster Hit Recovery with only 10% from your boots can prove difficult without sacrificing damage or life. Though you may think your red Heavy Boots with sexy statistics are cool, sadly, they are not the best choice for this build. Keep them on your Druid.

Crafted Boots with Faster Run/Walk, Faster Hit Recovery, and Mana – Again, not a bad choice, but not the best either. They can certainly help with hitting the Faster Hit Recovery breakpoint, and after Battle Orders, can add a substantial amount of mana to your big blue ball. That being said, at a gain of 4 mana per point placed into energy, the 15 strength you get from Sandstorm Treks just about compensates for the 40+ mana you would get from these boots. Save your money; they can be expensive.

Shields:

Spirit Monarch* – A Spirit Monarch is, by far, the best selection for this build. It gives +2 to All Skills, up to 35% Faster Cast Rate, vitality, mana, resistances, and an enormous amount of Faster Hit Recovery. Make sure you get one with the maximum allowable 35% Faster Cast Rate. It’s imperative. Also, the 55% Faster Hit Recovery offered by a Spirit Monarch is almost impossible to compensate for… Almost. Hence the second option.

Jeweler’s Monarch of Stability – This is another choice, but I wouldn’t recommend it. It provides a significant amount of Faster Hit Recovery, and socketing it with four 5/5 Cold Rainbow Facet Jewels would greatly increase your damage and minus resistance. In the end, though, the 55% Faster Hit Recovery from a Spirit Monarch is very hard to make up for, as are all of its other magnificent attributes.

Belts:

Arachnid’s Mesh Spiderweb Sash* – This is my favorite belt for this build. It gives +1 to All Skills and 20% Faster Cast Rate. No other belt in the game offers such caster appropriate qualities. You will pretty much need this to hit the Faster Cast Rate breakpoint while maintaining decent damage, but it’s not entirely necessary.

Rare Belt with 24% Faster Hit Recovery, strength, and life – This is a possibility, though honestly I wouldn’t recommend it. While it may make reaching the Faster Hit Recovery breakpoint easier, the +1 to All Skills provided by Arachnid’s Mesh outweighs any statistics you might find on a rare belt, not to mention a good rare belt can cost up to 20 times the price of a perfect Arachnid’s Mesh.

Amulets:

Armageddon Fletch* - With +2 to Sorceress Skills, 20% Faster Cast Rate, and a hefty dose of strength, life, mana, and resistances, this is the best possible amulet for any type of Sorceress. I am aware that finding one that won’t pull a Houdini on you can be outrageously difficult, so I will provide you with other options.

Crafted Amulet with +2 to Sorceress Skills and 20% Faster Cast Rate – This may be your best option next to an Armageddon Fletch. Getting the full 20% Faster Cast Rate from your amulet makes hitting the breakpoint a hell of a lot easier. Finding a crafted amulet with decent statistics aside from the skills and Faster Cast Rate can be hard. Aim for one with a hefty additive of strength, life, resistance, or mana… if you can afford it.

Rare Amulet with +2 to Sorceress Skills and 10% Faster Cast Rate – This is another great option. It makes hitting the Faster Cast Rate breakpoint a little easier, and if you find a good one, can provide a substantial amount of strength, life, mana, or resistance. Try to find one with at least two of these attributes. While the additional 10% Faster Cast Rate one can gain from a crafted amulet is extremely helpful, it is not entirely necessary.

Mara’s Kaleidoscope – If you cannot afford any of the above, or if you do not need the Faster Cast Rate, Mara’s Kaleidoscope is a magnanimous option. It provides +2 to All Skills, which helps with Battle Orders for a little more life. It also gives +5 points to all attributes. Nothing substantial, but it helps. Finally, it provides up to +30 to all resistances.
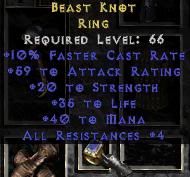
Rings:

Stone of Jordan* – You need one of these. Depending on the rest of your gear and your ability to reach the Faster Cast Rate breakpoint, you may even want two. +1 to All Skills, +20 to mana, and Increase Maximum Mana 25% make this a godsend for your Hybrid Blizzard Sorceress.

Bul-Katho’s Wedding Band – This is another great ring to have. If you are able to reach 105% Faster Cast Rate without the use of a 10% Faster Cast Rate ring and your life is a little low, slap one of these on your ring finger right next to your Stone of Jordan. Minnie, regrettably, requires a Faster Cast Rate ring.

Rare Ring with 10% Faster Cast Rate* – Diablo 2 has this wonderful way of making all the numbers fit. With a majority of the options I tried, a 10% Faster Cast Rate ring was necessary for this build. As I said, if you can achieve 105% Faster Cast Rate without one, by all means do so. If you can’t, however, try to find one with strength, life, mana, and a bit of resistance. A full +20 to Strength, while not entirely obligatory, allows you to switch out your Chains of Honor for an alternative armor. A crafted ring with similar stats would also work nicely.
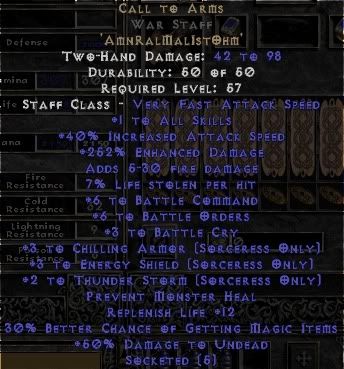


Switch:

Call to Arms War Staff* – This is a key item for this build. Since you are not putting any solid points into Energy Shield, get a Call to Arms with +3 Energy Shield in the base. You could also try to aim for one with +2 or +3 to any of the cold armors. Try to get one with +6 to Battle Orders; the other varying attributes aren’t nearly as important.


Inventory:

Annihilus Small Charm* – Self explanatory, really. Every character on Battle.net should have one of these. It gives +1 to All Skills and between +10-20 to All Attributes and resistances. Try to get one with +20 to All Attributes. The possible +20 to All Resistances isn’t necessary, though it certainly doesn’t hurt.

Hellfire Torch Large Charm* – Again, self explanatory. It provides an insane +3 to All Skills of a certain character class, as well as up to +20 to All Attributes and +20 to All Resistances. Try to get as high a boost as possible on both accounts.

Chilling Grand Charm of Vita (7-9)* – Yes, seven to nine. Minnie uses seven. This is because she has one 12% Faster Hit Recovery charm, as well as thirteen Small Charms instead of the usual ten. This is purely based on preference. If you don’t need the 12% Faster Hit Recovery from your inventory, by all means use eight or nine Chilling Grand Charms of Vita. And the eight or nine? Solely up to you, my friend.

Serpent’s Small Charm of Vita (10-13)* – You do not need the ever so popular Small Charms with +20 to Life and +5 to All Resistances. In this case, the 200 to 300 mana you gain from the Serpent’s Small Charms of Vita is far more vital. Again, whether you use ten or thirteen is completely up to you. It is all a matter of preference. Need resistances? Get them elsewhere.

Example Set-Ups:

The following examples are meant to provide you with clarification on set up options while maintaining the necessary breakpoints. They are not based on player versus player situations; they are solely based on affordability.

Example 1

Helm - Nightwing’s Veil Spired Helm
Amulet - Armageddon Fletch or Crafted Amulet with +2 to Sorceress Skills and 20% Faster Cast Rate
Ring 1 – Stone of Jordan
Ring 2 – Rare Ring with 10% Faster Cast Rate
Armor - Chains of Honor
Weapon - Death’s Fathom Dimensional Shard
Shield - Spirit Monarch
Gloves - Frostburns
Belt - Arachnid’s Mesh Spiderweb Sash
Boots – Grim Spur Chain Boots

Example 2

Helm - Nightwing’s Veil Spired Helm
Amulet – Rare Amulet with +2 to Sorceress Skills and 10% Faster Cast Rate
Ring 1 – Stone of Jordan
Ring 2 – Stone of Jordan
Armor – Ormus’ Robes
Weapon - Death’s Fathom Dimensional Shard
Shield - Spirit Monarch
Gloves - Frostburns
Belt - Arachnid’s Mesh Spiderweb Sash
Boots - Sandstorm Trek Scarabshell Boots

Example 3

Helm – Magic or Rare Circlet with +2 to Sorceress Skills and 20% Faster Cast Rate
Amulet – Rare Amulet with +2 to Sorceress Skills and 10% Faster Cast Rate
Ring 1 – Stone of Jordan
Ring 2 – Stone of Jordan
Armor – Ormus’ Robes
Weapon - Death’s Fathom Dimensional Shard
Shield - Spirit Monarch
Gloves - Frostburns
Belt – Rare Belt with 24% Faster Hit Recovery, strength, life, or resistances
Boots – Crafted Boots with Faster Hit Recovery and mana

Example 4

Helm - Nightwing’s Veil Spired Helm
Amulet – Rare Amulet with +2 to Sorceress Skills and 10% Faster Cast Rate
Ring 1 – Stone of Jordan
Ring 2 – Stone of Jordan
Armor – Ormus’ Robes
Weapon – Doom Berserker Axe
Shield - Spirit Monarch
Gloves – Trang-Oul’s Claws Heavy Bracers
Belt - Arachnid’s Mesh Spiderweb Sash
Boots - Sandstorm Trek Scarabshell Boots

Example 5

Helm – Nightwing’s Veil Spired Helm
Amulet – Mara’s Kaleidoscope
Ring 1 – Stone of Jordan
Ring 2 – Stone of Jordan
Armor – Skin of the Vipermagi Serpentskin Armor
Weapon - Death’s Fathom Dimensional Shard
Shield - Spirit Monarch
Gloves - Frostburns
Belt – Arachnid’s Mesh Spiderweb Sash
Boots – Sandstorm Trek Scarabshell Boots


As I stated in the beginning of this section, reaching the breakpoints while sustaining heavy damage is your primary goal. As explicitly depicted in the above examples, there are many ways to reach the 105% Faster Cast Rate and 86% Faster Hit Recovery breakpoints. 70% Absorb from Energy Shield is also highly achievable without a single base point into the skill. The possibilities are limitless.

Minnie reaches 105% Faster Cast Rate through one of two ways. Versus most opponents, she uses Death’s Fathom, Armageddon Fletch, Arachnid’s Mesh, Spirit Monarch, and a 10% Faster Cast Rate ring to hit 105% Faster Cast Rate. Versus characters with stacked resistance, such as Hammerdins or BvC’s, she simply switches her Death’s Fathom out for a Doom Berserker Axe and replaces her Nightwing’s Veil with a magic circlet socketed with two 5/5 Cold Rainbow Facet Jewels. For stacked resistances to the point of bad manners, she may also require her Jeweler’s Armor of the Whale. She reaches either 10k-11k Blizzard damage with -255 Cold Resistance (Death’s Fathom/Nightwing’s Veil) or 7.7k-8.3k Blizzard damage with -320 Cold Resistance (Doom Berserker Axe/Magic Circlet/Jeweler’s Armor of the Whale). She also hits 86% Faster Hit Recovery 100% of the time. She does this the same way regardless of the set-up; through her Grim Spur Chain Boots, Spirit Monarch, and her 12% Faster Hit Recovery Grand Charm. She has a Jeweler’s Armor of the Whale in the stash for certain situations, though the Chains of Honor is her primary armor of choice. Her Call to Arms is in a duped base War Staff with +3 to Energy Shield, +3 to Chilling Armor, and +2 to Thunder Storm, and provides her with 72% Absorb from Energy Shield while using the Chains of Honor and 69% Absorb from Energy Shield while using her Jeweler’s Armor of the Whale.

Obviously, depending on what you can afford, your gear and flexibility will vary. Reaching 105% Faster Cast Rate and 86% Faster Hit Recovery are absolutely essential. The way in which you achieve these goals is entirely up to you. If you don’t want to use a Faster Hit Recovery Grand Charm, put 7% Faster Hit Recovery jewels in your Death’s Fathom and Nightwing’s Veil. There are literally endless ways to set up your Energy Shield Hybrid Blizzard Sorceress, depending on your budget and the availability of equipment. How you reach the breakpoints is up to you, but once you reach those breakpoints, you’re going to want to actually use your Sorceress. Thus, I shall end this guide with a section on dueling strategies.

This post was edited by zmauls on Jun 29 2011 12:54pm
Member
Posts: 15,449
Joined: Oct 6 2007
Gold: 71.64
Jun 29 2011 12:54pm
Section IV: Dueling Strategies

There are a few things you need to know before taking your Blizzard Sorceress into the Blood Moor to wreak havoc on other players. Hotkeys are essential. If you are still using the “F” keys as your hotkeys while facing adversaries, it’s time for a change. Also, it is vital to note that while this is, in fact, a Blizzard Sorceress, the Blizzard attack is by no means your primary means of taking down opponents. In this section, I will provide you with a functional hotkey set-up, and an overview of your individual attack methods and their uses, and strategies for dueling particular builds.

Hotkeys

The following is Minnie’s hotkey set-up. This is what works for me, and should not be considered your only option. Any variation of this set-up would work fine. It depends on what you are comfortable with. For Minnie, Left Click is always Ice Blast. The Right Click hotkeys are as follows.

A – Teleport

S – Frozen Orb or Glacial Spike (discussed soon)

D – Blizzard

F – Telekinesis

W – Weapon Switch

Ice Blast is the cold version of Fire Bolt. It can deal immense damage, and also has the advantage of stunning opponents. This should be your left click, though it doesn’t have to be. It is widely beneficial when stomping opponents (discussed next), and is basically your main offensive attack. Frozen Orb is helpful as well. When dueling, if you find yourself chasing down an opponent with low life, Frozen Orb may be your best option in finishing them off. Blizzard is highly injurious, though it is not always your chief assault. It can be used both offensively and defensively. Telekinesis is your version of Mindblast, though sadly, it isn’t nearly as annoying. Versus opponents with low Faster Hit Recovery, it can be immeasurably profitable. Weapon Switch is important when on the defensive. I will discuss why next.

Attack and Defense Methods

These are some attack methods that many players either use improperly or do not know how to use at all. I will explain how they are done, and when I get to the actual strategy portion, I will let you know when they are appropriate. Some of them are difficult to perfect, though with time and practice, they become second nature.

Invisible Blizzard – This is similar to the Paladin’s Desynch, which allows him to seemingly disappear from your map and then reappear unnoticed. Invisible Blizzard is achieved quite simply. While immobile, cast Blizzard in any of the four corners of your Diablo 2 screen. After casting Blizzard, quickly switch to Teleport and move in the opposite direction as quickly as possible. That is to say, if you cast Blizzard in the upper right hand corner, teleport towards the bottom left hand corner. This will not only make your Blizzards invisible on your opponents screen, but also invisible on their Maphack if they use one.

Namelocking – This is done by placing your mouse over your opponents character. Once you have a hold on them and their character name is visible, left or right click and their name will remain in your casting array. Especially with attacks like Blizzard, namelocking will have opponents thinking you are using an Auto Aim hack.

Stomping – This is probably the most useful method of taking down other casters. Stomping is done by namelocking an opponent and teleporting onto their character. Once you have teleported directly onto your opponent, left click for Ice Blast while keeping your mouse steady on their toon. If you lose the namelock while switching to left click, it is probable that your Ice Blasts will hit them anyway, so long as you are facing them. For example, if you stomp an opponent and your Sorceress appears to their left, Ice Blasting to the right (regardless of having them namelocked) will knock them out in a few short seconds. Ice Blast has the benefit of stunning opponents, so once you have your adversary stomped, it’s pretty much game over.

Self Blizzard – Self explanatory, really. Put your mouse over your character and cast Blizzard. Casting Blizzard on yourself, self Blizzard. Duh.

Trailing – Trailing is easy. All you do is Self Blizzard, teleport once in any direction, and repeat. It’s called trailing because you leave a trail of Blizzards in your wake. Again, self explanatory.

Telekinesis Switch – This is just what it sounds like. As I stated, Telekinesis is the Sorceress’s version of Mindblast. If you namelock an opponent, use Telekinesis to stun them. Then, switch to Blizzard while remaining namelocked and the Blizzard will cast directly on top of them.

Weapon Switch Glitch (WSG) – This can be hard to master, but it’s vital to your survival while facing Trapper Assassins and speedy Bowazons. If you find yourself trapped in an Assassin’s Mindblast, press your weapon switch hotkey rapidly while walking or running away. You will quickly be out of your Faster Hit Recovery lock and able to Teleport to safer ground.

Now that I’ve discussed the necessary dueling techniques, it’s time to move on to specific strategies versus popular Player versus Player builds. This is the closing of my guide, and should not be taken lightly. There are a variety of ways to deal with individual opponents, but those I will provide you with will enhance your knowledge, and at least give you a basis on where to start. Everyone plays differently, so these may not always work; you must practice using your Sorceress and find the methods that best suit you.

Strategies

Amazons

Bowazons – Bowazons are one of your main problems as a Sorceress with no block. Any good ones are fast… really fast. Your best bet here is to keep your distance and cast Frozen Orb from afar. As long as you’re not namelocked, their Guided Arrows will simply fly by you. If you notice a halt in the buzzing by of Guided Arrows, it is most likely because you’ve locked them in Dodge, Evade, or Avoid. This is your chance. Keep casting Frozen Orb as you inch up on them. Once they’re on your screen, stomp and Ice Blast. They should be dead within one or two hits.

Javazons – These characters are a joke, especially if you’re using your Chains of Honor. They will most likely try to run towards you, in which case you simply trail and wait for them to kill themselves. If they are playing defensively, that is, waiting for you to come to them, tempt them with some close range Ice Blasts. Once they start coming towards you, namelock and hold Ice Blast. They will be dead before they get a chance to use Charged Strike. If they are a Teleporting Javazon, they are equally easy. Once you see they have you namelocked, self Blizzard and avoid them. They will Teleport into an ice storm in be dead in seconds.

Assassins

Trappers – These will, undeniably, be your hardest opponent. Due to your Faster Hit Recovery not being very good because of your low Energy Shield percentage, Mindblast is very difficult to overcome. With your Chains of Honor a single trap will not do very much damage, but you may find yourself slowly withering away under their grasp if you get caught in a set of five. My best advice is to play defensively. Trail and pray they teleport into an invisible Blizzard. Stomping a Trapper is not, I repeat, is not a good idea. You will get locked, and you will die. Keep your distance. It may take quite some time, but slowly chipping away at their health with Frozen Orb may cause them to play more aggressively, in which case trailing becomes much easier. If you get caught in a mess of Mindblasts and traps, WSG to break the Faster Hit Recovery lock and Teleport away as quickly as possible. Trappers are certainly tough, but they are not impossible to defeat. With Fade on top of stacked resistance, using your Doom may be necessary. In this case, however, I do not recommend you remove your Chains of Honor.

Whirlwind Assassins – Whirlwind Assassins are, for the most part, pretty easy to deal with. Whether they are a Hybrid Assassin or a pure Ghost, the method is the same. As a hybrid, their traps will do practically no damage, so don’t worry about dying to a lightning storm. Wait for them to start using Dragon Flight or Teleport in attempt to Whirlwind your character into oblivion. When they do, self Blizzard and they should be finished in no time. Again, if Fade is proving difficult to deal with, using Doom is a viable option.

Kickers – The purest of melee Assassins. Don’t get caught, or you will be dead in no time. Play defensively and avoid them as best as possible. Trailing here is important; a few slip-ups and said kicker will be slain.

Necromancers

Bone – Though Bone Necromancers can be difficult to catch, they are pretty easily dealt with once you’ve mastered stomping. Their Clay Golem will most likely be immune to your attacks, but thankfully there is a method of coping with this abhorrence. With 70% Energy Shield, both their Bone Spears and their Bone Spirits will do minimal damage. The only time you’re really in trouble versus a Bone Necromancer is if you get caught in an array of Bone Spirits. A fat swarm of them can take away a substantial amount of life. Avoid the Bone Spirit swarms. As for the Necromancer himself, I suggest trailing and casting invisible Blizzard as much as possible. Once they’re on your screen, stomp and cast Ice Blast. If their Golem is in the way, use Glacial Spike, as the explosive damage will slap them pretty hard. It is in this situation that you would have Glacial Spike as one of your hotkeys as opposed to Frozen Orb.

Poison – Poison Necromancers are simple. If you do get hit with a Poison Nova, you’re done, but thankfully a Poison Nova’s range is fairly acute. Avoid getting too close; don’t stomp. Trail and use invisible Blizzard to your advantage. If they get close enough for you to namelock them, use either Blizzard or Telekinesis switch. Fire Golems are not immune to your attacks, so their use as a protective shield is outmoded.

Barbarians

BvC – Barbarians versus Caster. This build is explicitly designed to take you down. They have a mess load of life, and usually, pretty high resistances. Luckily, they are not really a threat, and the method to their defeat is simple. Avoid getting caught in their Leap Attack, although, even if you do, your Faster Hit Recovery should be high enough for it not to completely stun you. When they get close, self Blizzard. They will teleport onto to you and get caught in your Blizzard attack. Keep in close range; they don’t have any long distance attacks. Self Blizzard, teleport away, rinse, wash, and repeat. Though it may take a few minutes, you should be able to take them down without getting hit… and even if you do, with 2,000 life and 3,500 mana, one Whirlwind won’t be enough to kill you. If they start a berserker craze, stay as far away as possible; the attack strategy remains the same. Stacked resistance? Doom is a plausible option. Once a well rounded BvC slaps on two Ravenfrost Rings and a +160% to Cold Resistance shield, it might be time to Save and Exit.

Melee Barbarians – Any melee class doesn’t stand a chance. Simply trail, self Blizzard, and wait. They’ll forfeit hastily.

Paladins

Hammerdins – Hammerdins can be tough, but nowhere near impossible to take down. If they are playing defensively, as in casting hammer fields and running away, you should be fast enough to get in front of them and cast a Blizzard on their next destination. If they are playing offensively, as most do, trail until they come into your view. Once they do, there’s no doubt they’ll try to stomp you. Watch for the moment of hesitation; they are trying to namelock you. Namelock them first, and simply hold Ice Blast. They will Teleport into an assortment of icy death, and along with being stunned, be dead in seconds. If they’re using a ton of Cold Resistance, using your minus resistance gear could be your best option.

Smiters – No problem here. Trail, self Blizzard, invisible Blizzard, and they should self destruct. If they get too close, try namelocking them and using Ice Blast. They should be dead before they get close enough to smite you. If they are a Vindicator/Templar build, their Fist of Heavens won’t harm you enough to be considered a threat. Charging can be a means of defeat for your Sorceress, as Smite Paladins often have intensely high Charge damage. If you get locked in a Charge, WSG and get away as quickly as possible. Then, refer back to the previous method. Stacked resistance? All minus resistance gear is feasible.

Chargers – See the second half of the above solution.

Fist of Heavens – Due to your Sorceress having stacked resistances and only 70% Energy Shield, Fist of Heavens will not do much damage to you, especially if you don’t get within range of their Conviction Aura. Keep your distance. Telekinesis switch can be useful here, as well as namelocking with a pure Blizzard. Stomping can also prove handy, as long as you’re good at it. First timers? Don’t try stomping just yet.

Sorceresses

Fire – As I mentioned earlier in this guide, even a high damage Fireball from a Fire Sorceress will not do much damage to your life. Trail and invisible Blizzard, and try hard not to get stomped. If you see that they have namelocked you and are simply spewing Fireballs in your direction, Teleport in a circular motion around them (avoiding the Fireballs) until they are visible on your screen. Then, stomp and Ice Blast. Boom, dead.

Cold – Cold Sorceresses are probably my favorite opponent to duel. They can prove tricky, but when it all comes down to it, the winner of this battle will be the one with more skill. Trail and invisible Blizzard. If they get too close, you can do one of two things; Telekinesis switch, or stomp. Either one is effective, though the ladder a bit more so than the former. Deciphering whose Blizzard is whose can be difficult. Just remember where you cast yours. Avoid getting stomped, and you should be the victor.

Lightning – Do no stomp a Lightning Sorceress! The outrageously high damage from their Lightning attack will stun you, and if you get caught, it will be the death of you. Trail and invisible Blizzard. Eventually, they will get caught in a storm, and they will suffer the consequences.

Nova – These characters are no match for your Energy Shield Hybrid Blizzard Sorceress. Their Novas will do very, very minimal damage, and with 86% Faster Hit Recovery, getting stunned… well, it just doesn’t happen. Namelock them when they start moving in for the Nova swarm, and cast Ice Blast. They will die in a short period of time. As for their Thunderstorm? If it has a high damage output, try to keep a bit of space between the two of you. Trail and watch them fall.

Druids

Windy – Windy Druids can be tough, but are by no means impossible. If they are playing defensively, use Frozen Orb to diminish their wolves and Oak Sage. Then, when they Teleport away to recast, run up on them, stomp, and Ice Blast their ass into demolition. If they are playing offensively, the strategy is quite different. Trail and self Blizzard, and avoid getting caught in a flock of Tornadoes. Once they’ve Teleported into one of your Blizzards, they will most likely move away from you to recast their minions. At this point, it’s time for you to take the offensive. Stomp and tear’em down. Druids, for the most part, usually have pretty bad Faster Hit Recovery as well. Telekinesis switching is not a bad method.

Shapeshifting – Whether they are Rabies, Fury, or Fire Claw, all Shapeshifting Druids will have to actually hit you to do any damage. Thus, the strategy is simple. Self Blizzard and trail. They are quite easy to overpower. If a Fury Druid has a gigantic amount of Faster Run Walk and you can’t seem to trail quickly enough, simply namelock and repeatedly smother him with Ice Blast. With the stun, he won’t be able to get close enough to hit you.

Closing

First and foremost, I would like to thank unholy_ally@D2jsp, Guards@D2jsp, Chels@D2jsp,and Psychopathic@D2jsp for helping me to finalize my guide. I also want to thank all the readers for taking the time to look through it in its entirety; I know it’s lengthy, but I was trying to be as thorough as possible. While some of you may disagree with ever combining Energy Shield with a Blizzard Sorceress, I believe that if you try this build you will find it quite effective. I have done my best to provide options, alternatives, and strategies that suit you, the Diablo 2 player. Your satisfaction is important to me! If you have any questions, comments, or observations that you’d like to share, please don’t be afraid to send me a Personal Message. I think you will find I am quite friendly, and awfully forgiving. If you need help with anything, whether it be gear set-ups, dueling strategies, or simple tips, I will be there to assist you.

I wish you the best of luck in building your Energy Shield Hybrid Blizzard Sorceress.

Best regards, and thank you.

-zmauls@D2jsp
Member
Posts: 17,465
Joined: Jun 18 2010
Gold: 248.00
Jun 29 2011 12:54pm
why so repost?
Member
Posts: 15,449
Joined: Oct 6 2007
Gold: 71.64
Jun 29 2011 01:02pm
Quote (ranorn @ Jun 29 2011 02:54pm)
why so repost?


Grammatically corrected with the help of those mentioned in the closing.
Member
Posts: 12,566
Joined: Sep 15 2009
Gold: 0.00
Jun 29 2011 01:12pm
Yeah it got stickied only because it looks nice, is written over-politely and most importantly, it doesn't differ in quality from the majority of stickies, in terms of facts :)

I still like your tactics vs hybrids and sins in general.
Member
Posts: 15,449
Joined: Oct 6 2007
Gold: 71.64
Jun 29 2011 01:16pm
Quote (sevlo @ Jun 29 2011 03:12pm)
Yeah it got stickied only because it looks nice, is written over-politely and most importantly, it doesn't differ in quality from the majority of stickies, in terms of facts :)

I still like your tactics vs hybrids and sins in general.


Only non-block ES Blizzard guide on Jsp bro ;)

This post was edited by zmauls on Jun 29 2011 01:16pm
Member
Posts: 16,266
Joined: Feb 9 2008
Gold: 0.01
Jun 29 2011 01:16pm
Quote (sevlo @ Jun 29 2011 12:12pm)
Yeah it got stickied only because it looks nice, is written over-politely and most importantly, it doesn't differ in quality from the majority of stickies, in terms of facts :)

I still like your tactics vs hybrids and sins in general.


As said in my other post from last thread:

Quote (Bryant @ Jun 29 2011 11:21am)
I'm loving these parts:

Trappers – These will, undeniably, be your hardest opponent. Due to your Faster Hit Recovery not being very good because of your 70% Energy Shield, Mindblast is very difficult to overcome. Though with your Chains of Honor their traps will not do very much damage, you may find yourself slowly withering away under their grasp. My best advice is to play defensively. Trail and pray they teleport into an invisible Blizzard. Stomping a Trapper is not, I repeat, is not a good idea. You will get locked, and you will die. Keep your distance. Though it may take quite some time, slowly chipping away at their health with Frozen Orb may cause them to play more aggressively, in which case trailing becomes much easier. If you get caught in a mess of Mindblasts and traps, WSG to break the Faster Hit Recovery lock and Teleport away as quickly as possible. Though Trappers are certainly tough, they are not impossible to defeat. With Fade on top of stacked resistance, using your Doom may be necessary. However, I do not recommend you remove your Chains of Honor.

Whirlwind AssassinsWhirlwind Assassins are, for the most part, pretty easy to deal with. Whether they are a Hybrid Assassin or a pure Ghost, the method is the same. As a hybrid, their traps will do practically no damage, so don’t worry about dying to a lightning storm. Wait for them to start using Dragon Flight or Teleport in attempt to Whirlwind your character into oblivion. When they do, self Blizzard and they should be finished in no time. Again, if Fade is proving difficult to deal with, using Doom is a viable option.

I lol'd.

Member
Posts: 15,449
Joined: Oct 6 2007
Gold: 71.64
Jun 29 2011 01:17pm
Quote (Bryant @ Jun 29 2011 03:16pm)
As said in my other post from last thread:


That's not what it says. Ha.
Member
Posts: 16,266
Joined: Feb 9 2008
Gold: 0.01
Jun 29 2011 01:18pm
Quote (zmauls @ Jun 29 2011 12:17pm)
That's not what it says. Ha.


Ya, OKAY!
Go Back To Strategy & Guides Topic List
12316Next
Add Reply New Topic New Poll