d2jsp
Log InRegister
d2jsp Forums > Off-Topic > Computers & IT > Computer Building > Eek's Step By Step Guide To Building Your Own PC > With Pictures. -= Noob Proof =-
12318Next
Add Reply New Topic New Poll
Member
Posts: 16,893
Joined: Aug 25 2005
Gold: 8,601.26
Aug 7 2009 01:19am
Okay, I've seen tons of threads here lately where someone wants to get a gaming pc.. yet they don't want to build them themselves since they're afraid of screwing something up. Well, no problem.. i'm here to help. This post will guide you step by step to building your own gaming rig.

Lets get started.

First the essentials. Every gaming pc these days will almost always have these parts.. Minimum to function
  • Case
  • Power Supply
  • CPU (Central processing unit)
  • Motherboard
  • Graphics Card
  • Optical Drive
  • Hard Drive
  • Ram (Random Access memory)


Step # Most important step- Make sure you always ground yourself before working on the pc to prevent damage to the components. Ground yourself by
1) Using a Anti-static Wrist strap
2) Working on a Anti-static Mat
3) Touching the metal part of your case / power supply.

**DO NOT work on carpet etc.

Step 1:
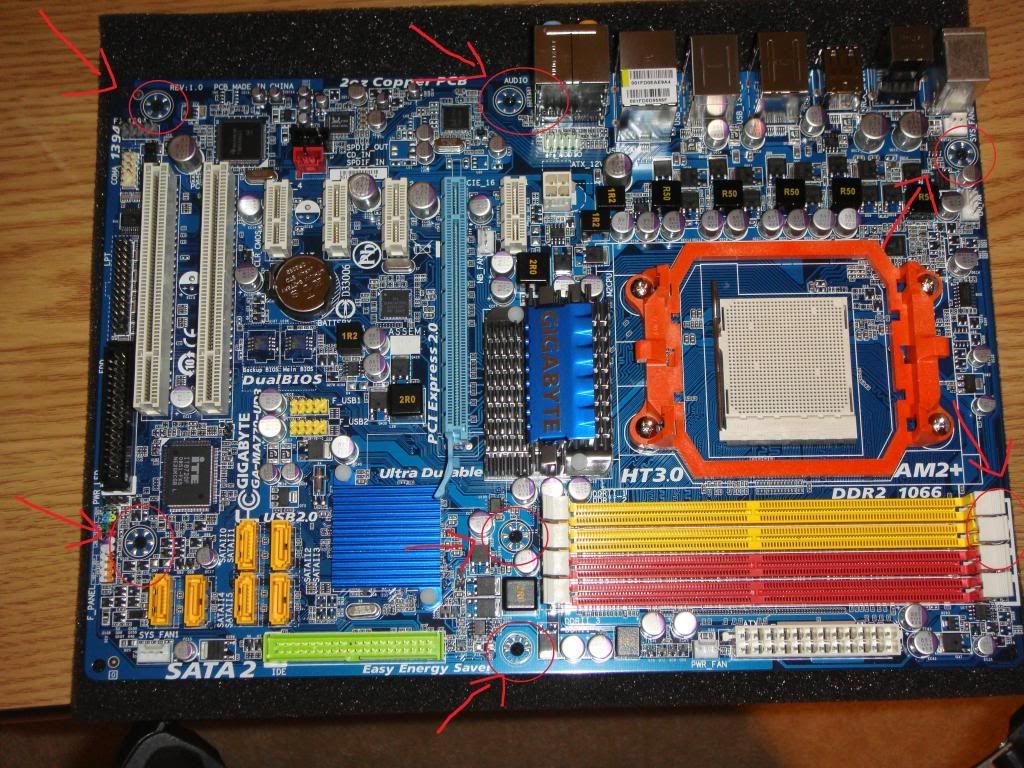
Unbox your motherboard and look for the mounting holes. The mounting holes will vary from board to board. Here, i have highlighted the mounting holes on this particular motherboard (Gigabyte MA770-UD3)


Step 2:
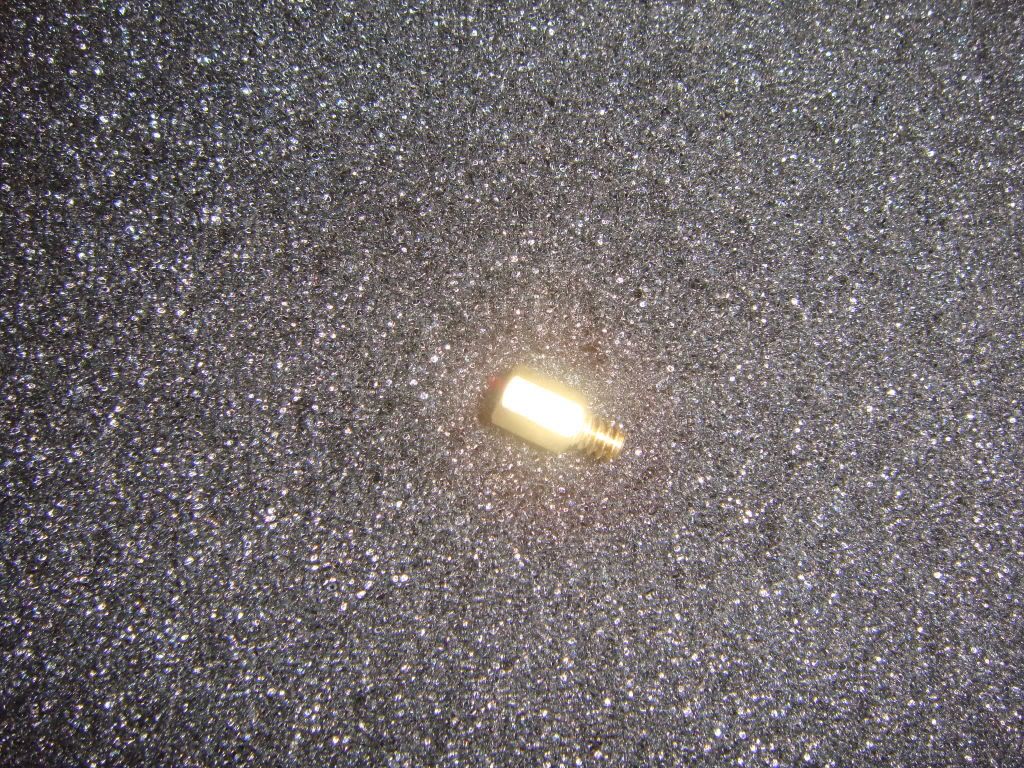
Next, you will need to prep your case in order to mount the motherboard. You will most likely have to install these into the corresponding holes your motherboard would need.

Motherboard stand offs.


This post was edited by Eek on Aug 7 2009 01:40am
Member
Posts: 16,893
Joined: Aug 25 2005
Gold: 8,601.26
Aug 7 2009 01:21am

All standoffs screwed into the motherboard tray.


Step 3:
Next, we are going to prep the motherboard it self. This step, we will install our Processor. For this demonstration, i will be using a AMD Athlon II X2 245 AM3 processor.

Before you insert the processor, notice this little gold triangle on one particular corner? You will need to match this with the indent on the motherboard cpu bracket.


Member
Posts: 16,893
Joined: Aug 25 2005
Gold: 8,601.26
Aug 7 2009 01:22am

Step 4: Before you install the processor, you will need to raise the pressure lever as shown in the picture above. Then simply drop the processor into the socket ( DO NOT FORCE THE PROCESSOR IN IF IT DOESN'T DROP IN. YOU WILL BENT THE PINS AND DAMAGE THE PROCESSOR). Once it's drop in, clamp the processor into place by lowering the lever to it's original position.


Step 5: Now we will install the hsf (heatsink fan) to cool the processor. For this demonstration, i will be using the stock AMD cooler since other aftermarket coolers have their own installation process. I will use a "universal" cooler.

The HSF unit.


Underside of the HSF. DO NOT WIPE OF THE HIGHLIGHTED AREA. THAT IS THE THERMAL COMPOUND.

Member
Posts: 16,893
Joined: Aug 25 2005
Gold: 8,601.26
Aug 7 2009 01:22am

Now sit your HSF on the processor and let the hook latch onto the "nipple" of the mobo cpu bracket as shown.


Do the same for the opposite side.


Finally push the lever down to secure it into place.

Member
Posts: 54,607
Joined: Aug 4 2005
Gold: 0.02
Aug 7 2009 01:23am
they should just watch the how to build a pc tiger direct video
google and youtube your best friends
><
Member
Posts: 16,893
Joined: Aug 25 2005
Gold: 8,601.26
Aug 7 2009 01:23am

Now connect the power cord to the mobo. Most motherboard will lable this CPU_FAN


Step 6: We will now install the memory modules. Start by locating the ram slots (the long vertical ones on the top right side of the motherboard)

Install the ram into the correct slots, DIMM 1 and DIMM2 in this case. (Some motherboard are different and will require you to install them in different slots/ configuration, consult your manual first before installation.)


Insert the ram modules and make sure the "indent" lines up with the one in the slot.

Member
Posts: 16,893
Joined: Aug 25 2005
Gold: 8,601.26
Aug 7 2009 01:23am

Push the ram down and close the clamps on the side of the socket.


That's it for mobo preparation. now..

Step 7: Install the i/o plate and screw the motherboard to the tray

Install the motherboard i/o plate to the case.


Install from the inside and push out toward the back of the case.

Member
Posts: 16,893
Joined: Aug 25 2005
Gold: 8,601.26
Aug 7 2009 01:24am
When i/o plate is in place. Drop the motherboard into the case and screw it in with the screws provided. (Don't not over tighten)
--------------Forgot to take pics for this particular step.. i'm sure you guys and galscan figure it out ;)------------------

Step 8: After motherboard is installed. now install the optical drives and Hard drives.

For this particular case ( Cooler Master Elite 332 ), i will need to remove the front bezel of the case in order to mount my optical drive.


After that.. just slide your drive into place and lock it into place if your case is a screwless design.. else just screw it in.. Then do the same for the harddrive.

Step 9: Installing the Power supply.

Now slide your powersupply into the slot and screw it in.


Step 10: Connecting power cables.

First we will start off by plugging in the cpu 4/8 pin power cable. On this motherboard, it uses a 4pin. (Some motherboards require 8pins, more extreme ones will use 12/16pins)

This is the 4pin cable.

Member
Posts: 16,893
Joined: Aug 25 2005
Gold: 8,601.26
Aug 7 2009 01:25am

Insert it into this slot. Some motherboard's cpu power will be on the upper left corner of the cpu socket.


Now plug in the 20/ 24pin atx power cable.


Plug it into this slot.

Member
Posts: 16,893
Joined: Aug 25 2005
Gold: 8,601.26
Aug 7 2009 01:25am

All plugged in.


Next, we need to arm the switches from the case to the motherboard. These are what typical case connectors look like.


You will have to plug them into a area like this on the mobo, (most likely on the lower right corner of the motherboard.) You don't have to worry about polarity when pluggin them in.. doesn't make a difference.

Go Back To Computer Building Topic List
12318Next
Add Reply New Topic New Poll